There are certain recipes that transport you back to childhood with just one bite. For me, this old fashioned caramel cake recipe is that recipe – the one my grandmother made for every holiday, every church homecoming, and every family birthday worth celebrating. After years of perfecting her technique and countless hours stirring caramel over a low flame, I’m sharing everything I’ve learned so you can create this Southern classic in your own kitchen 2026.
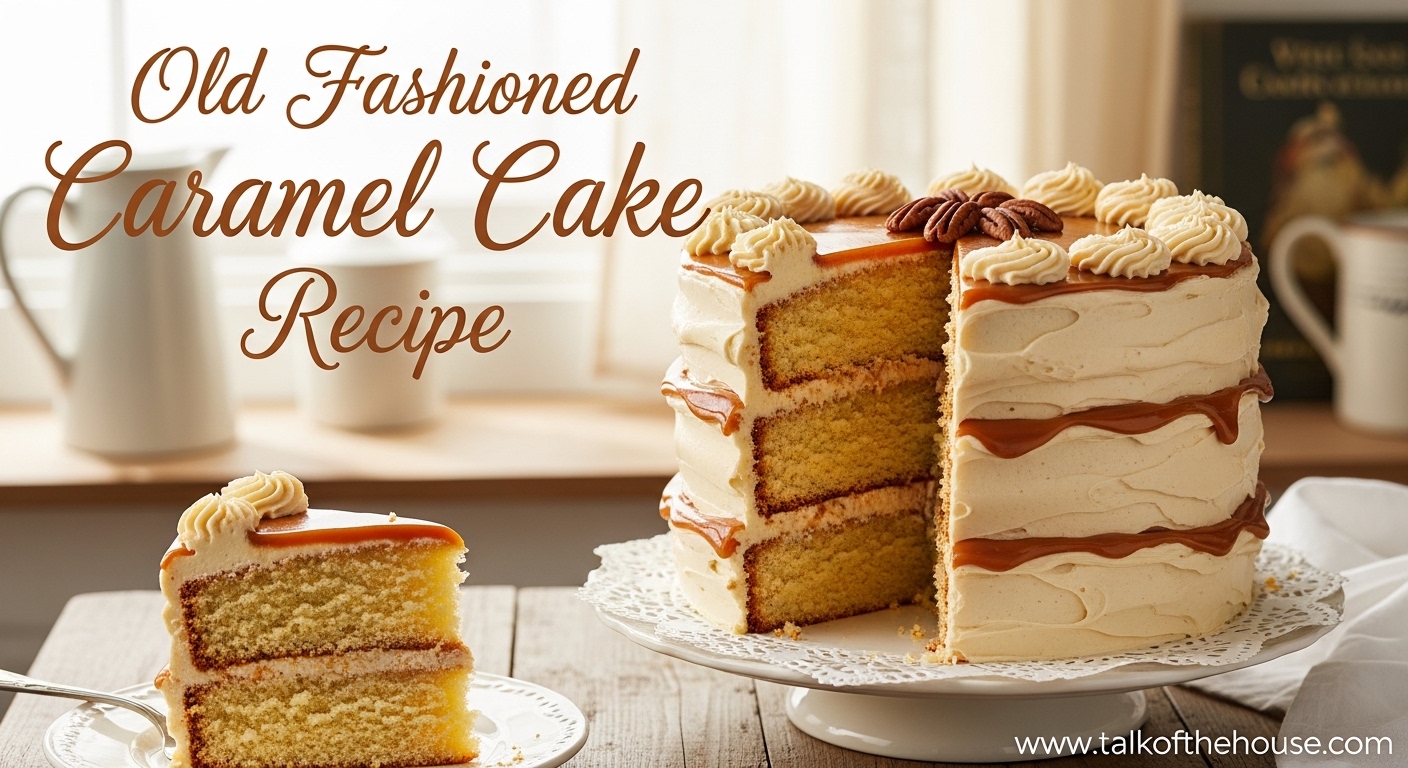
This is not a quick dessert. This is a labor of love that demands patience, attention, and about three hours of your time. The reward is a showstopping centerpiece – layers of tender yellow cake draped in silky, homemade caramel icing that cascades down the sides in golden ribbons.
I’ve broken down every step in detail because I want you to succeed on your first attempt. The caramel icing is where most home bakers struggle, so I’ve included extensive troubleshooting guidance and visual cues to help you nail that perfect soft ball stage every single time.
Table of Contents
What is Old Fashioned Caramel Cake?
An old fashioned caramel cake is a heritage Southern dessert that combines moist yellow cake layers with a rich, cooked caramel icing made from scratch. Unlike modern frostings that rely on powdered sugar and butter, this icing is essentially candy – slowly cooked butter, sugar, and evaporated milk that transforms into a pourable, fudgy coating as it cools.
This cake holds deep cultural significance in Southern and African American communities, where it has appeared at family gatherings, church potlucks, and holiday tables for generations. The recipe was passed down through grandmothers and aunts who guarded their caramel techniques carefully, each developing their own signature method for achieving that perfect consistency.
Where did caramel cake originate? While the exact origin is debated, food historians trace this particular style of caramel cake to the American South, particularly Mississippi and Louisiana, sometime in the late 19th or early 20th century. The technique of cooked caramel icing emerged from the necessity of creating impressive desserts with simple, available ingredients – granulated sugar, butter, and evaporated milk.
The oldest known cake recipes actually date back to ancient Egypt, but caramel as we know it developed in the 17th century when American colonists began experimenting with boiled sugar and dairy. This specific cake represents the convergence of European cake-baking techniques and American caramel innovation, perfected over generations in Southern kitchens.
What makes this cake truly special is the contrast between the light, airy cake layers and the decadent, almost-fudge-like icing. It’s simultaneously delicate and indulgent – a combination that has kept it relevant for well over a century despite countless modern dessert trends.
Old Fashioned Caramel Cake Ingredients
Quality matters enormously in this recipe. Because there are no fancy techniques to hide behind, each ingredient needs to pull its weight. I recommend reading through this entire list before you begin, as caramel making requires your full attention once started.
For the Yellow Cake Layers:
- 3 cups cake flour (not all-purpose – the lower protein content creates a tender crumb)
- 1 tablespoon baking powder
- 1/2 teaspoon salt
- 1 cup unsalted butter, room temperature (softened but not melted)
- 2 cups granulated sugar
- 4 large eggs, separated (room temperature)
- 1 teaspoon vanilla extract
- 1 cup whole milk, room temperature
- 1/4 teaspoon cream of tartar
Why cake flour? Cake flour has a lower protein content (around 8%) compared to all-purpose flour (10-12%), which means less gluten formation and a more tender, delicate crumb. This is essential for achieving that classic light texture that pairs beautifully with the rich caramel.
For the Caramel Icing:
- 2 cups granulated sugar
- 1 cup unsalted butter (do not substitute margarine)
- 1 can (12 ounces) evaporated milk (NOT sweetened condensed milk)
- 1 teaspoon vanilla extract
- Pinch of salt
The distinction between evaporated milk and sweetened condensed milk is crucial. Evaporated milk is simply milk with about 60% of the water removed – it has no added sugar. Sweetened condensed milk has sugar added and will completely change the chemistry of your caramel, resulting in an overly sweet, potentially grainy mess.
Equipment You’ll Need:
- Two 9-inch round cake pans
- Parchment paper
- Electric mixer (stand mixer preferred but hand mixer works)
- Large heavy-bottomed saucepan or Dutch oven for caramel
- Candy thermometer (essential for beginners)
- Small bowl of ice water for soft ball testing
- Long-handled wooden spoon
- Wire cooling racks
- Cake stand or serving plate
Ingredient Substitutions:
If you can’t find cake flour, you can make a substitute by removing 2 tablespoons from each cup of all-purpose flour and replacing it with 2 tablespoons of cornstarch. Sift together thoroughly before using.
No buttermilk? Create a substitute by adding 1 tablespoon of white vinegar or lemon juice to 1 cup of whole milk. Let it sit for 5 minutes until slightly curdled.
How to Make the Yellow Cake Layers
Start by preheating your oven to 350°F. Grease your cake pans with butter, line the bottoms with parchment paper, and grease the parchment. This triple-protection method ensures your cakes release cleanly every time.
Step 1: Prepare the Dry Ingredients
In a medium bowl, whisk together the cake flour, baking powder, and salt. Whisking aerates the flour and ensures even distribution of the leavening – critical for a cake that rises uniformly without doming excessively.
Step 2: Cream Butter and Sugar
In the bowl of your stand mixer fitted with the paddle attachment, beat the room temperature butter on medium speed until creamy, about 2 minutes. Add the sugar gradually and continue beating until the mixture is light and fluffy, 4-5 minutes total. Do not rush this step – proper creaming incorporates air that will give your cake its lift.
Step 3: Add Egg Yolks and Vanilla
Add the egg yolks one at a time, beating well after each addition. Mix in the vanilla extract. The batter should look smooth and pale yellow. If it appears slightly curdled, don’t worry – it will come together in the next step.
Step 4: Alternate Dry Ingredients and Milk
Reduce mixer speed to low. Add the flour mixture in three additions, alternating with the milk in two additions, beginning and ending with flour. Mix just until combined after each addition – overmixing develops gluten and creates a tough, dense cake.
Step 5: Whip the Egg Whites
In a clean, dry bowl with the whisk attachment, beat the egg whites and cream of tartar on medium-high speed until stiff peaks form, about 3-4 minutes. The cream of tartar stabilizes the whites and helps them hold their structure when folded into the batter.
Step 6: Fold in Egg Whites
Gently fold one-third of the whipped egg whites into the batter to lighten it. Add the remaining whites and fold just until no streaks remain. Use a large spatula and a gentle cutting motion – deflate the whites as little as possible.
Step 7: Bake
Divide the batter evenly between your prepared pans. Bake for 25-30 minutes, rotating the pans halfway through if your oven has hot spots. The cakes are done when they pull away from the sides of the pan and a toothpick inserted in the center comes out with just a few moist crumbs attached.
Step 8: Cool
Let the cakes cool in their pans for 10 minutes, then turn out onto wire racks to cool completely. This cooling step is non-negotiable – warm cake will melt the caramel icing on contact. I often bake my layers the day before and wrap them well in plastic wrap once completely cool.
How to Make the Caramel Icing (The Critical Step)
This is where the magic happens – and where patience becomes your most important ingredient. The caramel icing requires 1.5 to 2 hours of slow cooking over low heat with constant attention. But the result is worth every minute of stirring.
What’s the secret to a rich caramel flavor? Three things: time, butter, and the Maillard reaction that occurs as sugars slowly caramelize. Rushing this process creates a pale, bland icing. Giving it the full time develops complex, toasty, deeply satisfying caramel notes that cannot be faked.
Understanding Soft Ball Stage
Before you begin, let’s talk about the soft ball stage. This is the temperature range of 235°F to 240°F where sugar syrup dropped into cold water forms a soft, flexible ball that flattens when removed. This is the precise point where your caramel will be thick enough to coat the cake but still pourable enough to spread smoothly.
If you don’t have a candy thermometer, you can test using the cold water method. Keep a small bowl of ice water next to your stove. Drop a teaspoon of the cooking caramel into the water, let it cool for a few seconds, then gather it with your fingers. At soft ball stage, it will form a ball that flattens when pressed but doesn’t run.
Step 1: Combine Ingredients in Heavy Pot
In a large heavy-bottomed saucepan or Dutch oven (the mixture will bubble up significantly), combine the sugar, butter, and evaporated milk. The heavy bottom is essential – thin pans will create hot spots that can scorch your caramel.
Step 2: Start Cooking Over Medium Heat
Place the pot over medium heat and stir constantly until the butter melts and the sugar dissolves completely. Once everything is liquid and smooth, you can reduce the heat slightly to medium-low for the long cook.
Step 3: The Long Stir
Here’s where patience enters the picture. You need to stir this mixture continuously for 90 minutes to 2 hours. The stirring serves two purposes: it prevents the bottom from scorching and it helps the mixture evaporate water content slowly, which creates smooth rather than grainy caramel.
As you stir, you’ll notice the color gradually changing from pale beige to golden to amber to a rich caramel brown. This transformation happens slowly at first, then accelerates toward the end – so don’t walk away in the final 20 minutes.
Step 4: Watch for Visual Cues
At around 30 minutes, your mixture will be bubbling vigorously and turning light tan. At 60 minutes, it will thicken noticeably and deepen to golden brown. At 90 minutes, you’ll see the caramel clinging to your spoon and the bubbles will become slower and thicker.
When the caramel reaches the color of a copper penny and coats the back of your spoon so you can draw a line through it with your finger, you’re getting close. This visual cue is just as important as the temperature reading.
Step 5: Verify Soft Ball Stage
Once your thermometer reads 235°F, perform the cold water test to confirm. Drop a small amount into your ice water – it should form a soft ball that holds its shape momentarily before flattening. If it dissolves completely, keep cooking. If it forms a hard ball, you’ve gone too far.
Step 6: Add Vanilla and Salt
Remove the pot from heat immediately when you reach soft ball stage. Stir in the vanilla extract and pinch of salt – the salt enhances the caramel flavor and balances the sweetness. The mixture will bubble up when you add the vanilla, so stand back slightly.
Step 7: Cool Briefly
Let the caramel cool for 5-10 minutes, stirring occasionally. You want it thick enough to coat the cake but still thin enough to pour and spread. If it thickens too much while cooling, you can gently reheat it over low heat with a splash of evaporated milk.
How to Assemble and Ice the Cake
Place one cooled cake layer on your cake stand or serving plate. Level the top slightly with a serrated knife if it domed during baking – this prevents sliding and creates a stable base.
Pour about one-third of the warm caramel icing over the first layer, spreading it to the edges with an offset spatula. Some will drip down the sides – this is exactly the look we want. Top with the second cake layer and pour the remaining caramel over the top, letting it cascade down the sides in dramatic sheets.
Work quickly but calmly. The caramel sets as it cools, so you have a limited window to achieve your desired look. If the icing becomes too thick to pour, rewarm it gently over low heat for a minute.
Don’t aim for perfection with the icing. The beauty of this cake lies in its rustic, homemade appearance – the drips, the uneven coating, the golden rivers running down the sides. This is heritage baking, not fondant-covered competition cake.
Troubleshooting Tips for Caramel Icing
What are common caramel cake mistakes? After testing this recipe dozens of times and hearing from hundreds of readers, these are the issues that crop up most frequently – and exactly how to fix them.
Problem: Grainy Caramel
Cause: Sugar crystals formed on the sides of the pot and fell back into the mixture, or the sugar wasn’t fully dissolved at the start. Solution: Prevention is best – wash down the sides of your pot with a wet pastry brush in the first 10 minutes of cooking. If your caramel is already grainy, you can sometimes save it by adding a tablespoon of corn syrup and stirring vigorously off the heat.
Problem: Caramel Too Thick to Spread
Cause: Cooked too long or too high heat. Solution: Add warm evaporated milk one tablespoon at a time, stirring until you reach pourable consistency. Don’t add cold milk or water – this can cause seizing.
Problem: Caramel Too Thin and Won’t Set
Cause: Didn’t reach soft ball stage. Solution: Return to the pot and continue cooking, stirring constantly, until you reach 235-240°F. Test with the cold water method to be certain.
Problem: Caramel Burned
Cause: Heat too high or stopped stirring. Unfortunately, burned caramel cannot be saved – the bitter flavor permeates everything. Start fresh with lower heat and constant stirring. This is why a heavy-bottomed pot matters so much.
Problem: Cake Layers Sliding
Cause: Caramel too warm when applied, or cake layers not completely cool. Solution: Ensure cakes are fully cool (even chilled) before icing. If caramel is very hot, let it cool slightly before pouring. You can also insert bamboo skewers through the layers to provide structural support.
Problem: Caramel Seized Up Suddenly
Cause: Temperature shock or moisture contamination. Solution: Low and slow heat with gentle stirring can sometimes bring it back. If it’s completely seized, you likely need to start over. Keep all moisture away from the cooking caramel.
How to Store and Make Ahead
This cake stores beautifully, which makes it perfect for entertaining. In fact, I think it tastes even better on day two after the flavors have melded together.
Store the cake at room temperature under a cake dome or loosely covered with foil for up to 3 days. The high sugar content in the caramel acts as a preservative, so refrigeration isn’t necessary unless your kitchen is very warm (above 75°F). If you do refrigerate, let the cake come to room temperature for an hour before serving for the best texture.
Can you make caramel cake ahead of time? Absolutely. Here’s my recommended timeline: Bake the cake layers up to 2 days ahead, wrap tightly in plastic wrap, and store at room temperature. Make the caramel icing the day you plan to serve – while you can rewarm caramel, fresh-made gives the best results. Assemble and ice the cake 2-4 hours before serving.
For freezing, wrap cooled cake layers individually in plastic wrap, then foil, and freeze for up to 3 months. Thaw overnight at room temperature before icing. I don’t recommend freezing the fully assembled cake as the caramel texture changes slightly after freezing.
High humidity environments (above 60%) will cause the caramel to absorb moisture and soften more quickly. In humid climates, consider adding a day to the make-ahead timeline and storing the un-iced layers longer, then icing closer to serving time.
Frequently Asked Questions
Can I use sweetened condensed milk instead of evaporated milk?
No, these are not interchangeable in caramel icing. Evaporated milk has no added sugar, while sweetened condensed milk contains added sugar. Using condensed milk will result in overly sweet, potentially grainy caramel with the wrong consistency.
Can I make this in a 9×13 sheet pan instead of layers?
Yes, you can bake this in a greased 9×13 pan for 35-40 minutes. However, the presentation is different – you’ll get a single layer cake with caramel poured over the top rather than the dramatic layer cake effect. You may also need slightly less caramel icing.
Why does the caramel take so long to cook?
The slow cooking is essential for developing flavor and achieving the right texture. Rushing the process by using higher heat causes grainy caramel with a pale, one-dimensional flavor. The full 1.5-2 hours allows the sugars to caramelize properly, creating that deep, complex taste that makes this cake special.
Can I make caramel cake without a candy thermometer?
Yes, though a thermometer makes it easier for beginners. Use the cold water soft ball test: drop a teaspoon of caramel into ice water and try to form it into a ball with your fingers. At soft ball stage (235-240°F), it will form a flexible ball that flattens when pressed.
What can I do with failed caramel?
If your caramel is grainy but not burned, you can often salvage it by reheating gently with a tablespoon of corn syrup or lemon juice. If it’s too thick, thin with warm evaporated milk. If it’s too thin, continue cooking to reach soft ball stage. Unfortunately, burned caramel cannot be saved and must be discarded.
Conclusion
This old fashioned caramel cake recipe connects us to generations of bakers who understood that the best things in life require patience and care. The time you spend stirring that caramel is not wasted – it’s an investment in creating something truly memorable for the people you love.
I hope you find as much joy in making this cake as my family has over the decades. When you slice into those tender layers and taste that perfectly cooked caramel, you’ll understand why this recipe has endured for generations. It’s more than dessert – it’s edible heritage.
If you try this recipe, I’d love to hear how it turns out. Whether it’s your first caramel cake or your fiftieth, each one is a celebration of tradition and the simple pleasure of homemade goodness. Happy baking 2026!