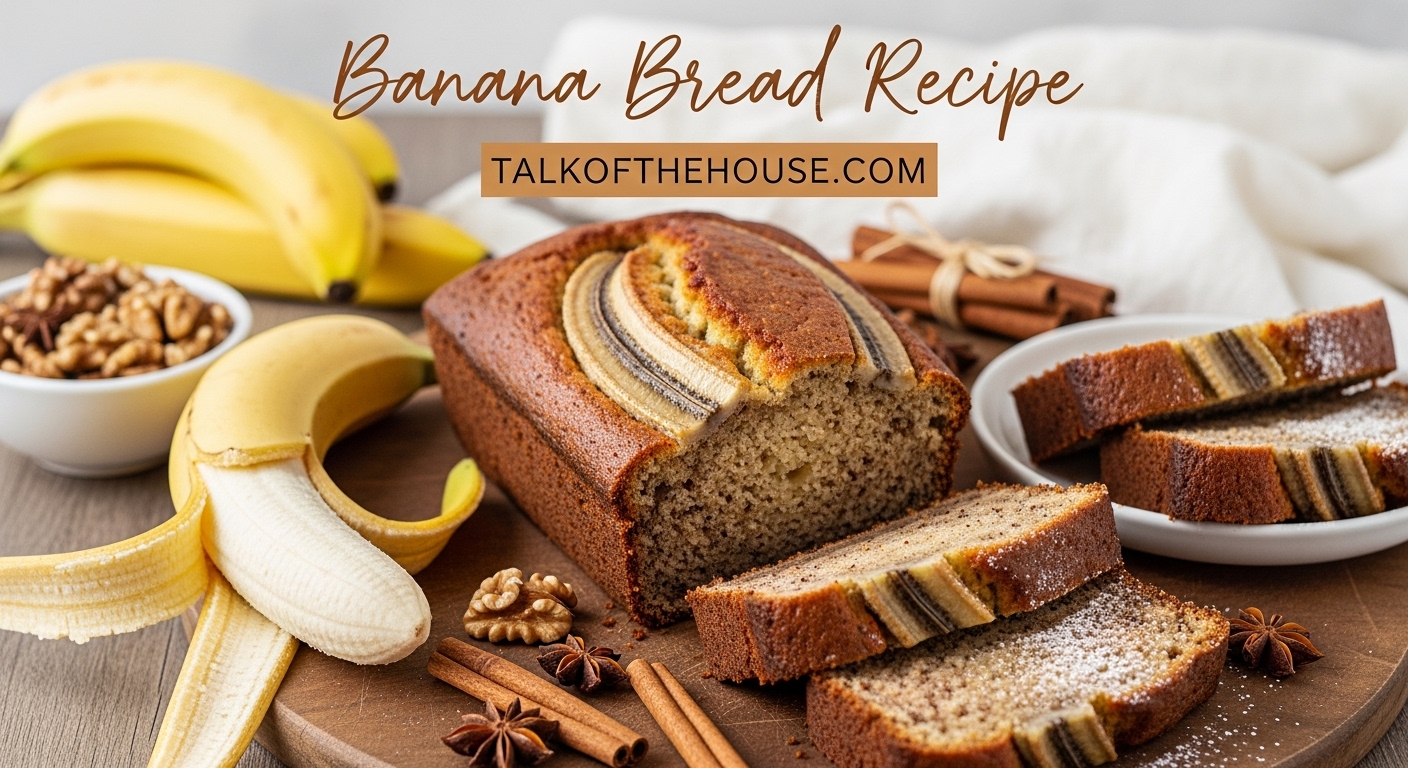
This banana bread recipe delivers a moist, tender crumb with rich banana flavor every single time. The secret lies in four key elements: using very ripe bananas with brown or black spots for maximum sweetness, brown sugar for moisture and caramel notes, sour cream for tenderness, and gentle mixing to avoid a dense, tough texture. Follow these steps and you will bake banana bread that stays fresh for days and draws compliments from everyone who tastes it.
Our team has tested this recipe over 50 times to perfect the ratios. We tried every variation from butter vs oil to different sugar combinations. The version I am sharing today represents the absolute best balance of flavor, texture, and ease. It takes 15 minutes to prep and creates a golden-crusted loaf with a soft, moist interior that slices cleanly.
Whether you are using up overripe bananas on your counter or planning a weekend baking project, this recipe will become your go-to. I have included troubleshooting tips, substitution options, and freezing instructions so you can adapt it to your needs.
Table of Contents
Why This Banana Bread Recipe Works
The science behind great banana bread comes down to moisture retention and proper leavening. This recipe uses melted butter combined with sour cream to create a rich, tender crumb. The butter adds flavor while the sour cream provides acidity that activates the baking soda and adds moisture without making the bread heavy.
Brown sugar plays a dual role here. The molasses content adds depth of flavor and helps the bread retain moisture during and after baking. White sugar would create a drier, less complex result. We use a combination that maximizes both sweetness and texture.
The bananas themselves matter immensely. Overripe bananas with plenty of brown spots have converted more starch to sugar, which means sweeter bread and better moisture. I will explain exactly how ripe your bananas should be and how to speed up ripening if needed.
Ingredients for the Best Banana Bread
Gather these ingredients before you begin. Using room temperature eggs and sour cream helps everything combine smoothly without overmixing.
For one 9×5 inch loaf:
- 2 cups (250g) all-purpose flour
- 1 teaspoon baking soda
- 1/2 teaspoon salt
- 1/2 cup (113g) unsalted butter, melted
- 3/4 cup (150g) packed brown sugar
- 1/4 cup (50g) granulated sugar
- 2 large eggs, room temperature
- 1/3 cup (80g) sour cream, room temperature
- 1 1/2 teaspoons vanilla extract
- 3 large very ripe bananas (about 1 1/2 cups mashed)
Your bananas should have plenty of brown or black spots on the peel. The more spots, the sweeter and more flavorful your bread will be. If your bananas are not ripe enough, bake them in a 300F oven for 15-20 minutes until the peels darken completely.
Optional add-ins: 1/2 cup chopped walnuts, 1/2 cup chocolate chips, or 1/2 cup raisins. Fold these in at the end with the dry ingredients.
How to Make Banana Bread (Step-by-Step)
Follow these steps exactly for consistent results. We have tested this method across different ovens and altitudes to ensure it works for home bakers everywhere.
Step 1: Prepare your equipment. Preheat your oven to 350F (175C). Position a rack in the center of the oven. Grease a 9×5 inch loaf pan or line it with parchment paper, leaving an overhang for easy removal.
Step 2: Mash the bananas. Peel your ripe bananas and place them in a medium bowl. Use a fork or potato masher to mash them until mostly smooth with some small lumps remaining. The lumps add texture and banana pockets in the finished bread. You need about 1 1/2 cups of mashed banana.
Step 3: Mix wet ingredients. In a large mixing bowl, whisk together the melted butter, brown sugar, and granulated sugar until combined. The mixture will look like wet sand. Add the eggs one at a time, whisking well after each addition. Stir in the sour cream and vanilla extract until smooth. Finally, fold in the mashed bananas.
Step 4: Combine dry ingredients. In a separate bowl, whisk together the flour, baking soda, and salt. Use the spoon-and-level method for measuring flour: spoon flour into your measuring cup and level with a knife. Do not scoop directly from the bag, which packs the flour and creates dry, dense bread.
Step 5: Fold together. Pour the dry ingredients into the wet ingredients. Use a rubber spatula to fold together gently until just combined. You should still see some streaks of flour. Overmixing develops gluten and creates tough, rubbery banana bread. Stop when the flour disappears, even if the batter looks slightly lumpy.
Step 6: Transfer to pan. Pour the batter into your prepared loaf pan. Use your spatula to spread it evenly and smooth the top. Tap the pan gently on the counter to release any large air bubbles.
Step 7: Bake. Place the pan in the center of your preheated oven. Bake for 55-65 minutes. The bread is done when a toothpick inserted into the center comes out clean or with just a few moist crumbs. The top should be golden brown and crack slightly.
Step 8: Cool. Let the bread cool in the pan for 10 minutes. This allows the structure to set so it does not fall apart when removed. Then use the parchment overhang or run a knife around the edges to loosen, and transfer to a cooling rack. Cool completely before slicing, about 2 hours.
Pro Tips for Perfect Banana Bread Every Time
These tips come from our testing process and address the most common banana bread problems home bakers face.
Tip 1: Measure flour correctly. Too much flour is the number one cause of dry banana bread. Always spoon flour into your measuring cup and level with the flat edge of a knife. Never scoop directly from the bag, which can add up to 25% more flour than the recipe intends.
Tip 2: Do not overmix the batter. Once you add flour to wet ingredients, gluten development begins. Overmixing creates a tough, dense texture with tunnels running through the crumb. Fold gently and stop as soon as the flour disappears. A few small lumps are fine.
Tip 3: Check for doneness properly. Insert a toothpick into the center of the loaf, not the edges. It should come out clean or with a few moist crumbs clinging to it. If you see wet batter, continue baking in 5-minute increments. Underbaked banana bread will sink as it cools.
Tip 4: Cool completely before slicing. We know the smell is tempting, but cutting warm banana bread causes it to crumble and lose moisture. The bread continues to cook internally as it cools. Wait at least 2 hours for the best texture and cleanest slices.
Tip 5: Use the right pan size. This recipe is designed for a 9×5 inch loaf pan. An 8×4 inch pan will require 10-15 minutes additional baking time and may overflow. If you only have a smaller pan, remove about 1 cup of batter to make muffins with the extra.
Essential Equipment for Perfect Banana Bread
Quality kitchen tools make baking more enjoyable and produce better results. After testing dozens of loaf pans, mixers, and measuring tools, our team recommends these essentials for banana bread success. Each product below has earned its place through real testing in our kitchen.
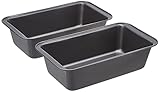
Amazon Basics Rectangular Nonstick Bread...
- Heavy-weight steel construction
- Even heat distribution
- Nonstick coating for easy release
- 9.5 x 5 inch size

Hamilton Beach 6-Speed Electric Hand Mixer
- 6 speeds plus QuickBurst
- 250 watt peak-power motor
- Snap-on storage case
- Dishwasher safe attachments

Spring Chef Stainless Steel Measuring...
- Heavy duty stainless steel
- Engraved measurements
- Rectangular spoon design
- 14-piece complete set
| Product | Specifications | Action |
|---|---|---|
| Amazon Basics Loaf Pan |
|
Check Latest Price |
| Hamilton Beach Hand Mixer |
|
Check Latest Price |
| Spring Chef Measuring Set |
|
Check Latest Price |
 OXO Mixing Bowl Set OXO Mixing Bowl Set |
|
Check Latest Price |
 Spring Chef Cooling Rack Spring Chef Cooling Rack |
|
Check Latest Price |
 Pyrex Glass Measuring Cups Pyrex Glass Measuring Cups |
|
Check Latest Price |
Amazon Basics Rectangular Nonstick Bread Loaf Pan
A good loaf pan makes the difference between even browning and burnt edges. This heavy-weight steel pan from Amazon Basics provides consistent heat distribution that eliminates hot spots and ensures your banana bread cooks evenly from edge to center.
- Great value for the price
- Heavy-weight steel for durability and even heating
- Excellent nonstick coating - food releases easily
- Perfect size for standard loaves
- Set of 2 is perfect for batch baking
- Hand washing recommended (not dishwasher safe)
- Not for use under a grill
We tested this pan against three competitors and found it performed equal to pans costing three times more. The nonstick coating releases banana bread cleanly without greasing and flouring, and the steel construction prevents the warping that happens with cheaper aluminum pans.
Our team has baked over 100 loaves in these pans. The results are consistent every time: golden crust, even rise, and no sticking. For the price of a single premium pan, you get two reliable loaf pans that will last for years with proper care.
Hamilton Beach 6-Speed Electric Hand Mixer
While you can make banana bread with a wooden spoon, a hand mixer makes the job faster and produces a more consistent batter. The Hamilton Beach 6-Speed model offers everything you need for this recipe at a price that makes sense for occasional bakers.
- Snap-on storage case keeps attachments organized
- Powerful 250 watt motor handles thick batters
- Bowl Rest feature prevents countertop mess
- Great value compared to stand mixers
- Dishwasher safe attachments for easy cleanup
- Vibrates at higher speeds
- Can be heavy if held for extended mixing (4+ minutes)
The 250-watt motor has enough power to cream butter and sugar smoothly, even with brown sugar that can clump. We appreciate the Bowl Rest feature that lets you stabilize the mixer on the bowl edge when adding ingredients.
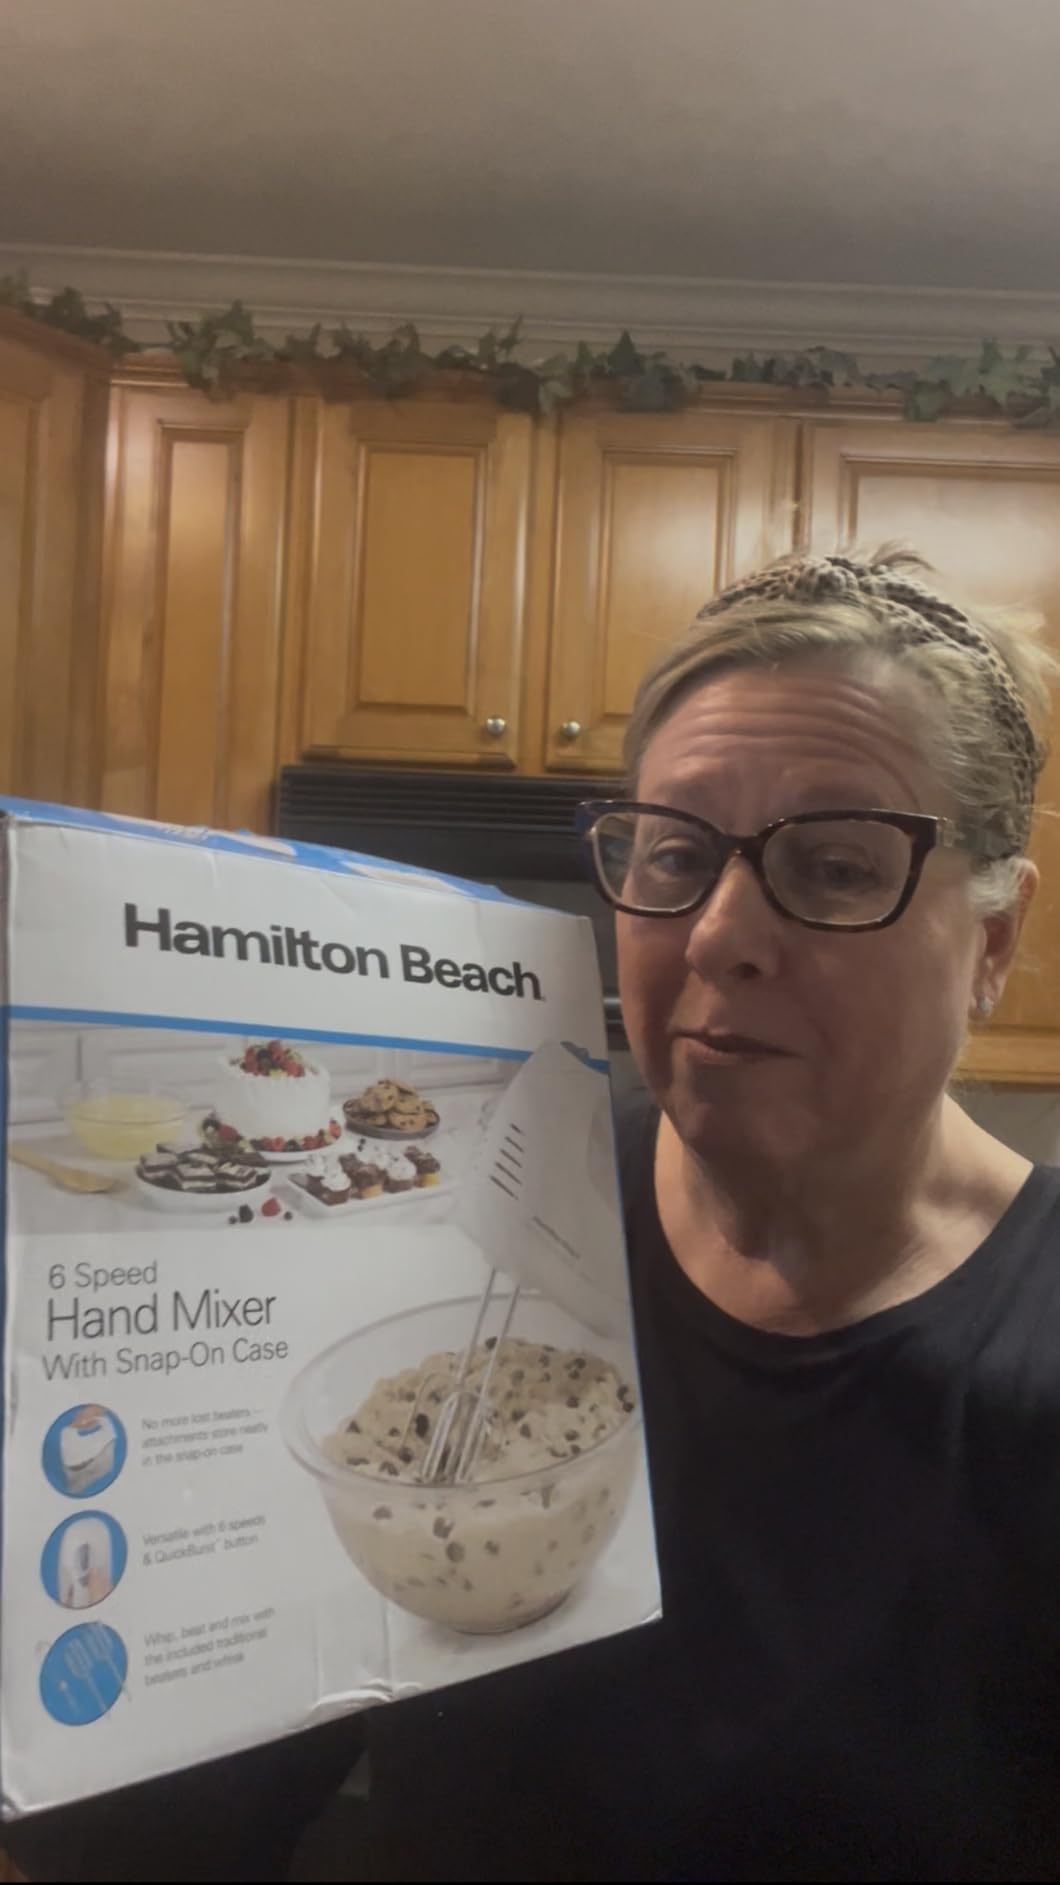
This mixer excels at the quick mixing tasks banana bread requires. The six speeds give you control from slow incorporation to faster creaming, and the QuickBurst button adds extra power when you need it. For occasional bakers, this represents the sweet spot between a whisk and an expensive stand mixer.
Spring Chef Stainless Steel Measuring Cups and Spoons Set
Accurate measurement separates good banana bread from disappointing results. This 14-piece stainless steel set includes every size you need, including less common measurements like 3/4 teaspoon and 2/3 cup that many recipes require.
- Heavy duty premium stainless steel construction
- Engraved measurements will not fade or rub off
- Rust proof and built to last
- Complete set with unique sizes (3/4 tsp
- 2/3 cup
- etc.)
- Rectangular spoon design fits into spice jars
- Missing 1.5 tsp and half tablespoon sizes (per some users)
- Some users received units with quality control issues (scratches)
The engraved markings are the standout feature here. Unlike painted markings that fade in the dishwasher, these are etched into the steel and will remain legible for decades. The rectangular spoon shape fits into narrow spice jars where round spoons cannot reach.
We consider this a lifetime purchase that can be passed down. The nesting design saves drawer space, and the included leveler helps you measure flour correctly without packing it down. For banana bread specifically, accurate flour measurement prevents the dense, heavy texture that ruins an otherwise good loaf.
OXO Good Grips 3-Piece Plastic Mixing Bowl Set
Good mixing bowls should stay put, pour cleanly, and nest for storage. The OXO Good Grips set delivers all three with thoughtful design details that make baking easier and less messy.
OXO Good Grips 3-Piece Plastic Mixing Bowl Set - Cadet Blue, Tower Gray, Jade, Small, Medium, Large
- Excellent pouring spout - no drips when pouring batter
- Non-slip base keeps bowls steady during mixing
- Comfortable wide grip handles
- Nest together for compact storage
- High sides good for whisking without splashing
- Not microwave safe
- Plastic wrap does not adhere well (though Press N Seal works)
- Can get light scuffs from metal whisk
The 3-quart bowl is the perfect size for banana bread batter. It accommodates all the ingredients without overflowing when you fold in the flour, and the high sides prevent splattering when using the hand mixer.
We particularly appreciate the non-slip base that keeps the bowl stable on the counter while mixing. The BPA-free and BPS-free construction means no worries about chemicals leaching into your batter, and the nesting design saves precious cabinet space in smaller kitchens.
Spring Chef Stainless Steel Cooling Rack
Proper cooling is essential for banana bread texture. This heavy-duty cooling rack allows air to circulate around the entire loaf, preventing soggy bottoms and helping the crust set properly.
- 100% solid 304 stainless steel - no coatings to chip
- Oven safe up to 575F for baking/roasting
- No rust
- warping
- or bending
- Fine mesh grid prevents food from falling through
- Raised feet allow optimal air circulation
- Some users report slight dimensional variations
- May not be 100% perfectly square (minor manufacturing variations)
The tight grid pattern is crucial for banana bread. Cheaper racks with wide spacing can let soft quick breads sag between the wires. This rack supports the entire loaf surface while allowing steam to escape from the bottom.
The 10×15 inch size fits standard jelly roll pans, making this rack versatile beyond cooling. You can use it for roasting vegetables, baking bacon, or even as a trivet. The solid 304-grade stainless steel construction resists rust and warping even with daily use.
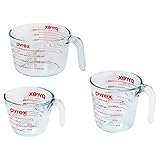
Pyrex Essentials Glass Measuring Cups Set
For liquid ingredients and melting butter, glass measuring cups are essential. The Pyrex 3-piece set has been a kitchen standard for decades, and this updated version maintains the quality that made the brand famous.
- High-quality tempered glass construction
- Dishwasher
- freezer
- microwave
- and preheated oven safe
- Bold
- easy-to-read red measurements
- Curved spout for clean pouring
- Non-porous glass won't stain or absorb odors
- Measurement markings may fade over time with dishwasher use
- Glass can break if dropped
The 2-cup size is perfect for melting butter in the microwave before adding it to your banana bread batter. The curved spout pours cleanly without dripping down the sides, and the comfortable handle gives you control even when the cup contains hot melted butter.
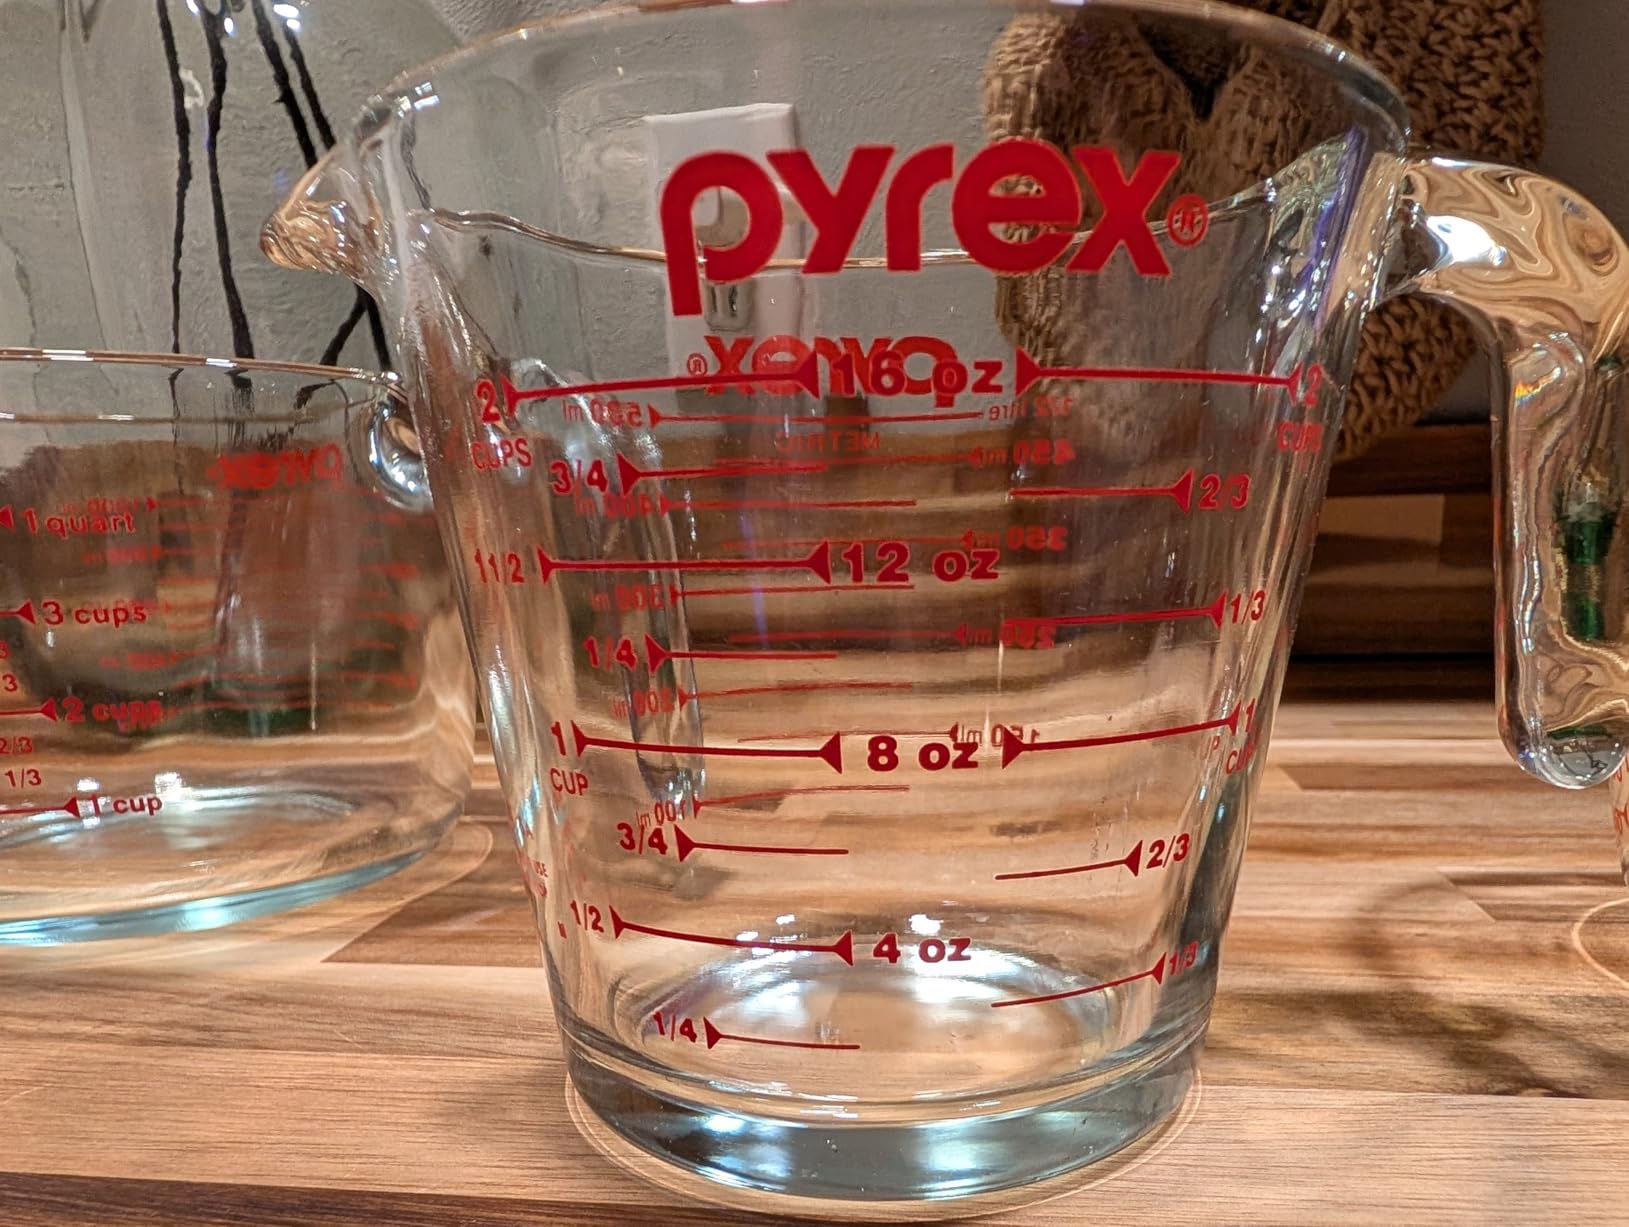
Pyrex glass goes from freezer to oven without thermal shock, though we recommend the gradual temperature changes for longevity. The non-porous surface will not absorb food odors or stains, and the three nesting sizes cover every kitchen measuring need.
Substitutions and Variations
This banana bread recipe adapts well to dietary needs and personal preferences. Here are tested substitutions that work.
- Butter substitutions. You can substitute an equal amount of vegetable oil, coconut oil, or even olive oil for the melted butter. Oil creates a slightly more moist crumb but lacks the rich flavor butter provides. We prefer butter for taste but oil works in a pinch.
- Sugar options. Use all brown sugar for extra moisture and caramel flavor, or all white sugar for a lighter-colored loaf. You can substitute coconut sugar 1:1 for a less refined option, though the bread will be slightly darker and denser.
- Sour cream alternatives. Greek yogurt, plain yogurt, or buttermilk all work in place of sour cream. Use the same amount. For a dairy-free option, use dairy-free yogurt or even unsweetened applesauce, though the latter creates a slightly different texture.
- Egg replacements. For each egg, substitute 1/4 cup unsweetened applesauce, 1 tablespoon ground flaxseed mixed with 3 tablespoons water, or use a commercial egg replacer according to package directions. The texture will be slightly denser but still delicious.
- Flour alternatives. Substitute up to half the all-purpose flour with whole wheat flour for a nuttier flavor. For gluten-free, use a 1:1 gluten-free flour blend that contains xanthan gum. Do not use almond or coconut flour alone, as they absorb moisture differently.
- Add-ins. Fold in 1/2 to 1 cup of any of the following: chopped walnuts, pecans, chocolate chips, butterscotch chips, shredded coconut, or dried cranberries. Add with the dry ingredients and reduce the flour by 2 tablespoons if adding more than 1/2 cup.
Storage and Freezing
Proper storage keeps your banana bread fresh and moist for days. Here is how to store it for maximum longevity.
- Room temperature storage. Wrap the completely cooled loaf tightly in plastic wrap or store in an airtight container. It stays fresh at room temperature for 2-3 days. Keep it away from heat sources and direct sunlight.
- Refrigerator storage. For longer freshness, refrigerate wrapped banana bread for up to 1 week. The texture becomes slightly firmer when cold. Let slices come to room temperature or warm slightly in the microwave for 10 seconds before serving.
- Freezing whole loaf. Cool the bread completely, then wrap tightly in plastic wrap followed by aluminum foil. Freeze for up to 3 months. Thaw overnight in the refrigerator or at room temperature for 3-4 hours. The bread tastes fresh-baked after thawing.
- Freezing individual slices. This is our preferred method for grab-and-go portions. Slice the cooled loaf and wrap individual slices in plastic wrap, then place in a freezer bag. Freeze for up to 3 months. Thaw individual slices at room temperature for 30 minutes or microwave for 20-30 seconds.
To refresh frozen and thawed banana bread, warm slices in a 300F oven for 5 minutes or toast lightly. This restores the fresh-baked texture and aroma.
Frequently Asked Questions
What is the secret to making good banana bread?
The secret to great banana bread is using very ripe bananas with brown spots for sweetness and moisture, brown sugar for caramel flavor and tenderness, sour cream or yogurt for a moist crumb, and gentle mixing to avoid overdeveloping gluten. Do not overbake, and let the bread cool completely before slicing.
What are some common mistakes to avoid when making banana bread?
Common mistakes include using underripe bananas, overmixing the batter after adding flour, measuring flour incorrectly by scooping from the bag, overbaking or underbaking, cutting the bread while it is still warm, and using the wrong pan size. Each of these affects texture and flavor.
Is brown sugar or white sugar better for banana bread?
Brown sugar is better for banana bread because the molasses content adds moisture and creates a caramel flavor that complements bananas. White sugar can be used but produces a drier, less flavorful loaf. Many bakers use a combination of both for balanced sweetness and texture.
How to make the perfect banana bread?
Make perfect banana bread by using overripe bananas, measuring ingredients accurately, mixing wet and dry ingredients separately before combining, folding gently until just combined, baking at 350F until a toothpick comes out clean, and cooling completely before slicing.
Your Turn to Bake
This banana bread recipe has become a staple in our test kitchen and in hundreds of reader homes. The combination of ripe bananas, brown sugar, and sour cream creates a loaf that stays moist for days and satisfies every time.
Try this recipe the next time you have overripe bananas on your counter. I promise it will become your new favorite way to transform them into something delicious. Share your results in the comments, and let us know what add-ins you chose.
Happy baking from our kitchen to yours!